At two years old and at the end of its contract, my iPhone 5 should have been destined for the kitchen drawer. Visits to countries as unforgiving as Iceland and Jordan had left it scarred and pitted, but its battery life was the killer: a decent train journey’s worth of Twitter and the PC&TA website would leave its battery meter dipping into the red.
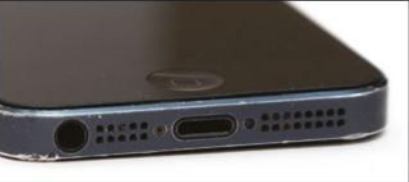
Step 1 of replacing iPhone 5 battery guide
So it was, I found myself with a pouchfull of tools and a replacement battery.Both came as a set for $20 from Amazon, although a quality-control issue meant I ended up getting a replacement for my replacement battery. iFixit sells a kit including all the tools you need for around $45. I opened iFixit’s step-by-step guide – bright, professional-quality photography and clear, concise instructions that ease the pain of a fiddly job.

And fiddly it is. The first step is to remove two of Apple’s controversial pentalobe screws from the bottom of the device: at 3.6mm long, these are – incredibly – the longest screws you’ll work with by some distance. Somewhere to keep everything safe is essential. One sharp hand movement on either your part or that of other household members could be enough to lose sight of them forever. The black pentalobe screws would be hard enough to find on a carpet – the screws you’ll find inside, impossible.
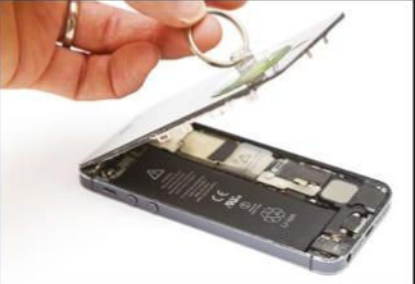
Step 2 of replacing iPhone 5 battery guide
With the screws removed, a tiny bitof brute force is called for. Attach the small sucker to the bottom of the screen and pull upwards slightly. This will reveal a sliver of a gap at the bottom of the screen, into which you’ll insert the thin end of the curiously named spudger. Gently prise up the bottom of the screen until you hear the click of the catches within giving way. Work your way up the sides of the phone until the sides and bottom are free. Bear in mind that, at this point, the only thing connecting the phone’s screen to the rest of its body are three incredibly fragile, wafer-thin ribbon connectors. These run the phone’s touch digitiser, LCD screen and the phone’s camera; yanking the screen away from the body could ruin everything.
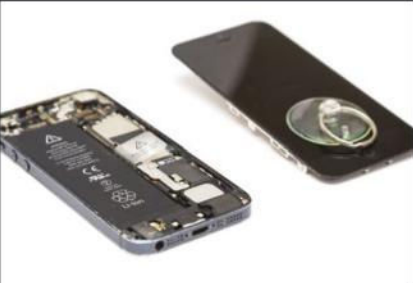
Step 3 of replacing iPhone 5 battery guide
Removing the blanking plate covering these ribbon connectors allows you to gently (gently!) prise the connectors from the phone’s motherboard. The screws holding down the blanking plate are of two different sizes, with the screw’s length differing by a measly 0.4mm. Place them separately, so you remember which is which.
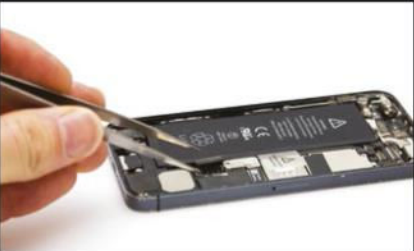
Step 4 of replacing iPhone 5 battery guide
The best way to disconnect the ribbon cables is with a fine metal spudger,or a finely tapered pair of tweezers. Prising rather than pulling feels like the safest approach. This done, the screen is free of the rest of the phone and can be gently popped on the side. You can remove the phone’s battery without removing the screen first. However, leaving it in-situ and connected to the body of the phone means it remains connected via the three fragile ribbon connectors, and a clumsy move could result in one of the ribbons tearing off its connector.
Step 5 of replacing iPhone 5 battery guide
Next, the business end: the metal blanking plate protecting the battery connector is unscrewed and, again, the fragile ribbon connector prised free. The battery is now disconnected from the phone, but glued in place. The right-hand side of the battery has enough room to insert a spudger, with which you can prise it free from the bottom of the phone. Once it’s lifted up sufficiently, gently lever it free. Installing the new battery involves simply reversing the process. There will be enough adhesive left in the bottom of the phone to secure it in place, and again, it pays to be extremely careful when connecting the battery and the three connectors for the screen.

Pro tips? Patience.
Becoming frustrated or trying to rush will result in broken connectors, lost screws and dead iPhones. While replacing the battery in another iPhone, I broke the plastic connector on the motherboard – fortunately, there’s enough of the connector housing left, plus the pressure from the metal blanking plate, to hold everything in place. The worst thing you can do is drop a screw – the smallest screw you’ll deal with is a mere 1.2mm long, and if you drop it on anything other than a sterile white surface, it vanishes instantly. These screws are pretty bouncy, and can’t be trusted not to ping off your work surface onto the floor. A fine set of tweezers is useful for picking up screws lying in the body of the phone itself – your fingers might as well be sausages with equipment this small. The good news: with my new battery installed, the phone fires up first time and I’m rewarded with a handset that can come off the charger in the early morning and last until dinner time, extending my phone’s life by at least a year.